Messaging
Marketo 2 Way SMS using Telnyx and Zapier
This post will walk you through how to build an inbound SMS responder using the Zapier automation tool and the Telnyx app.

Achieving 2 way SMS with Marketo will help you stay in compliance with SMS regulations by appropriately responding to customer requests to be unsubscribed or requests seeking help. As you have probably seen in the SMS you have received from companies, this is done using keywords of “STOP” and “HELP” to automatically send appropriate responses.
This post will walk you through how to build an inbound SMS responder using the Zapier automation tool and the Telnyx app, which will respond to these keywords and support the outbound SMS that you send from Marketo.
The first step to 2-way Marketo text messaging is to set up your Telnyx account. If you're new to the Telnyx platform, make sure to check out our Messaging Quickstart Portal Setup Guide which will walk you through the following steps for getting started:
- Create a free Telnyx portal account
- Buy a messaging capable phone number
- Create a messaging profile
- Associate your number with this messaging profile
- Obtain your API V2 authorization key
Sending Outbound SMS
Sending outbound SMS with Marketo can be achieved by using a webhook to call the Telnyx SMS API. This webhook can be called from triggered Marketo smart campaigns to build SMS into your automation workflows e.g. for webinar SMS reminders.
Responding to Inbound SMS
Once you have sent outbound SMS from within Marketo you can use the Zapier automation tool to define the logic to automatically send follow-up SMS in response to inbound queries.
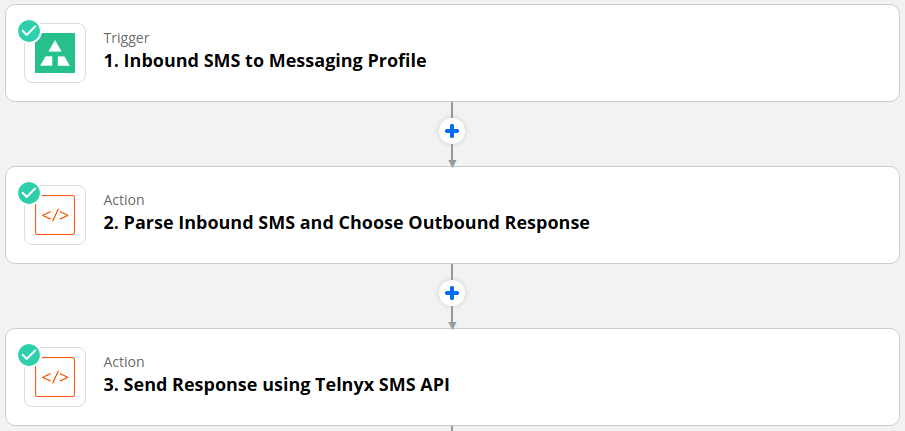
1. Inbound SMS to Messaging Profile Trigger
Follow the steps below when creating your new Zap to set up a trigger for inbound SMS to one of your Telnyx messaging profiles.
- Select the “Telnyx” app
- Select the “Receive a Message” event
- Click “Continue”
- Click on the “Choose an account” dropdown
- Select “Connect a new account”
- Enter your “v2 API Key” and “v2 profile id” in the window that pops up
- See the Telnyx SMS Quickstart Portal Setup Guide to get these 2 parameters
- Click “Yes, Continue”
Now any inbound SMS to any of the numbers associated with this messaging profile will trigger this Zap to run.
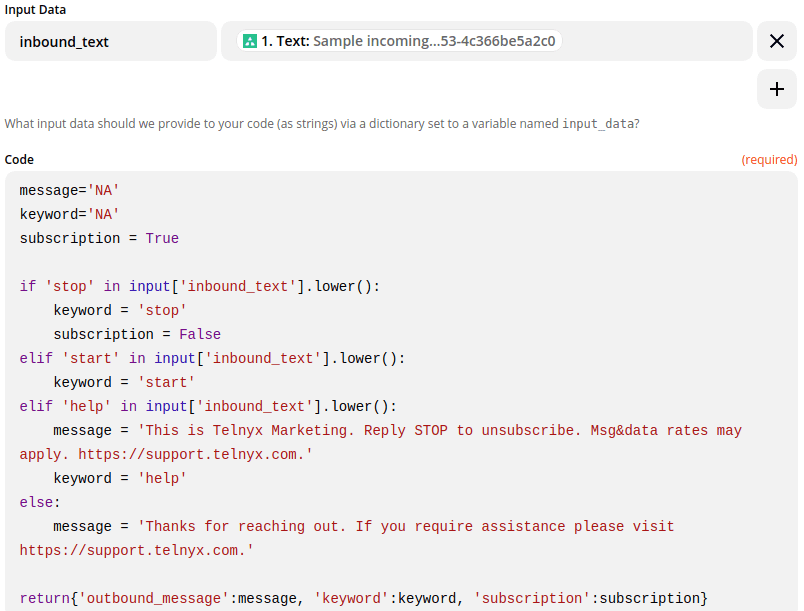
2. Parse Inbound SMS and Choose Outbound Response
In order to parse the inbound SMS for certain keywords and determine the corresponding response, the Python code below will be used in the “Code by Zapier” action.
It is not necessary to specify a message for the “STOP” response in the Python code because Telnyx automatically has an auto-response for opt-out keywords including “STOP”. The SMS below is sent to the person if their SMS includes the word “STOP” and Telnyx protects this person from receiving any more SMS from the number that sent the SMS.
The Telnyx "STOP" auto-response: “You have successfully been unsubscribed, you will not receive any more messages from this number. Reply START to re-subscribe.”
If someone wants to re-subscribe to SMS then the auto-response below will be sent when they reply with “START”.
Telnyx “START” auto response:
“You have successfully been re-subscribed to this number. Reply STOP to unsubscribe. Msg&Data Rates May Apply."

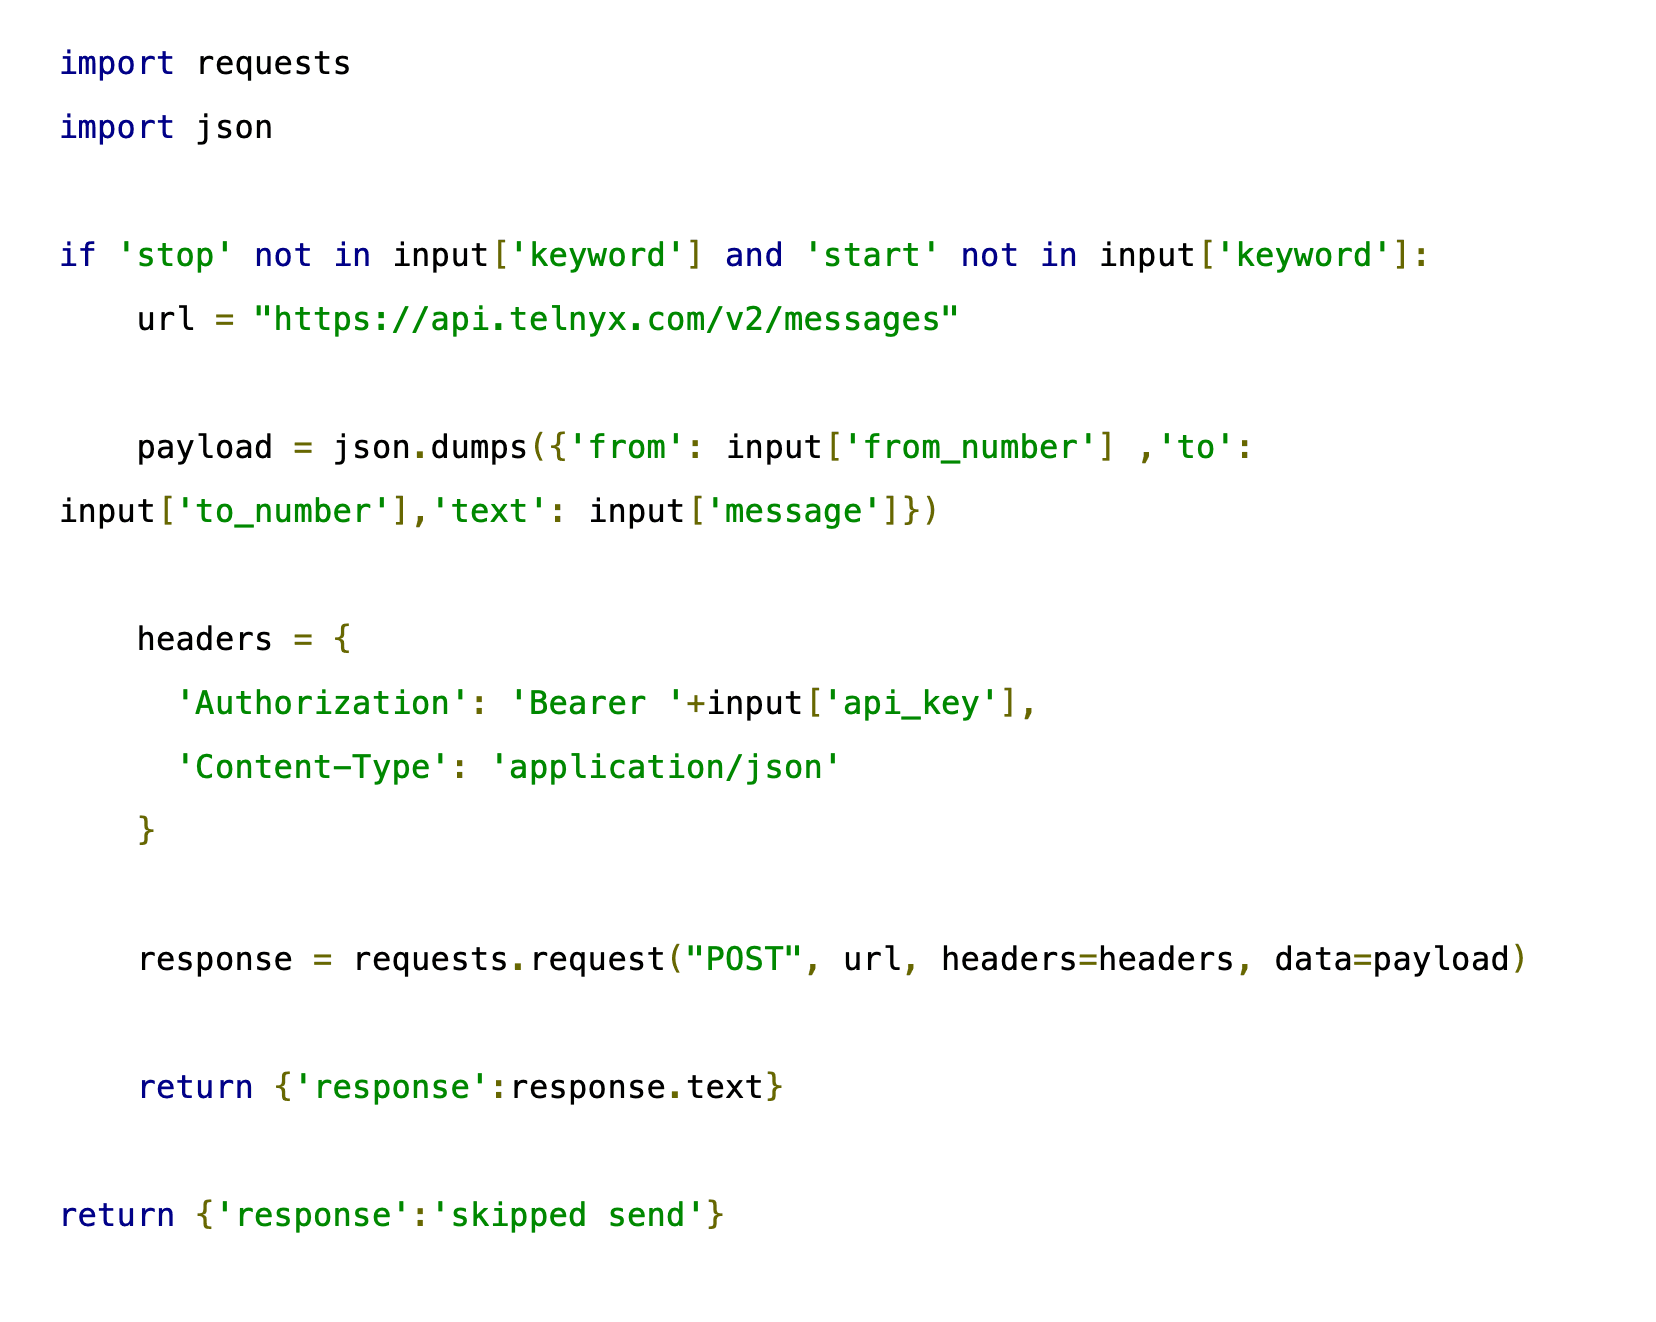
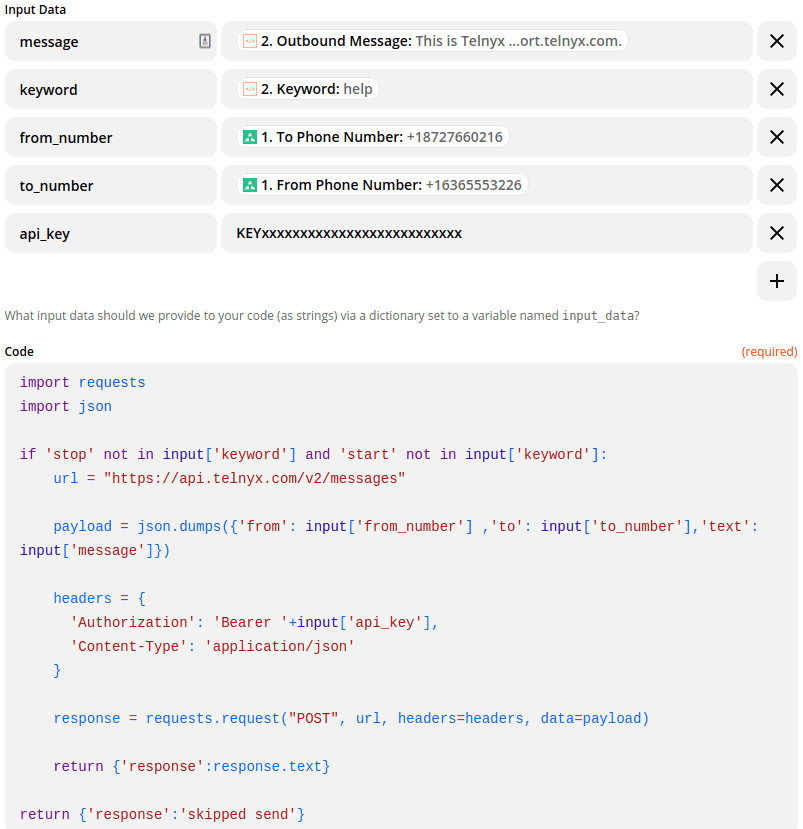
3. Send Response using Telnyx SMS API
Selecting the “Code by Zapier” action will allow you to use Python code to send the outbound response from Step 2 to the number that texted into the messaging profile. The Telnyx app does have a “Send SMS” action (see Step 5 below), however, the “Code by Zapier” action was used so that conditional logic could be added to ensure that an SMS will not send when the keyword is “stop” or “start” since Telnyx automatically responds to these keywords (see Step 2 above).
Inbound SMS Alerts via Email & SMS
If you want to get Slack notifications for inbound SMS then take a look at the Forward SMS to Slack, Email, & Another Number post to see how you can implement this.
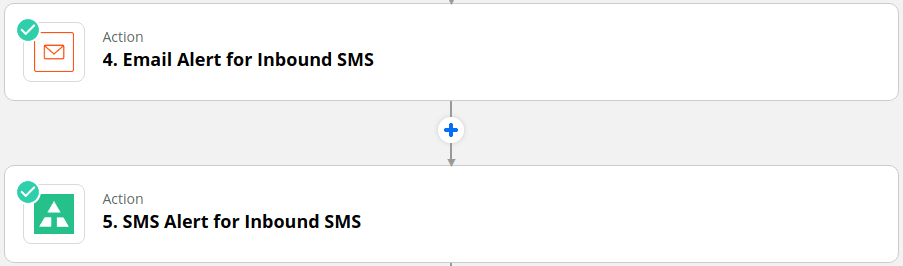
4. Email Alert for Inbound SMS
Creating an email alert in Marketo email marketing for an inbound SMS is possible; you’ll need to integrate it with an SMS provider (e.g., Zapier, Twilio, Sinch, Infobip) and utilize a webhook or API integration. If you want to get alerted whenever there is an inbound SMS to a number on your messaging profile you can use the “Email by Zapier” action to forward details of the SMS to your email inbox. You can also include the response sent in reply to the inbound SMS (if a response is sent from Step 3) and a link to the history of the Zap for easy follow-up and debugging if necessary.

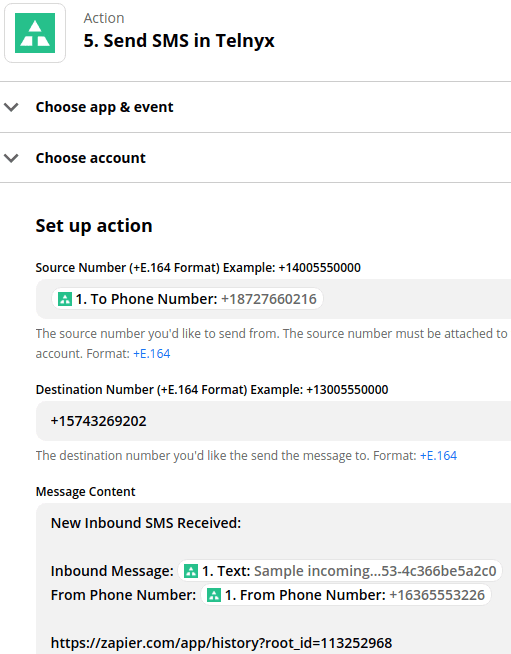
5. SMS Alert for Inbound SMS
Additionally, if you also want SMS alerts for any inbound SMS then you can use the “Send SMS” action from the Telnyx app using the account you created in Step 1. Unlike, the email alert it is not recommended to include the response from Step 3 since the response is very long. There is also no need to include the “To Phone Number” since the number you will receive the alert from will be the same number that the inbound SMS was sent to.
Although using Zapier on mobile will not be the most friendly user experience, you can also include the link to the Zap’s history for quick access.
Setting Subscription after “STOP” or “START” Response
After the appropriate SMS has been sent to the customer it may be necessary to unsubscribe or resubscribe them to SMS notifications. As mentioned previously, if someone replies with “STOP” then Telnyx will automatically prevent this person from receiving further SMS, and conversely, when someone replies “START” it will re-enable SMS to this person.
While this is the case, you should still have a field in Marketo e.g. “SMS Subscription – Webinar”, for a person’s SMS subscription and turn this to
- False for the “stop” keyword so that you are not unnecessarily sending SMS from Marketo that will be blocked by Telnyx
- True for the “start” keyword so Marketo knows it can start sending outbound SMS to this person again
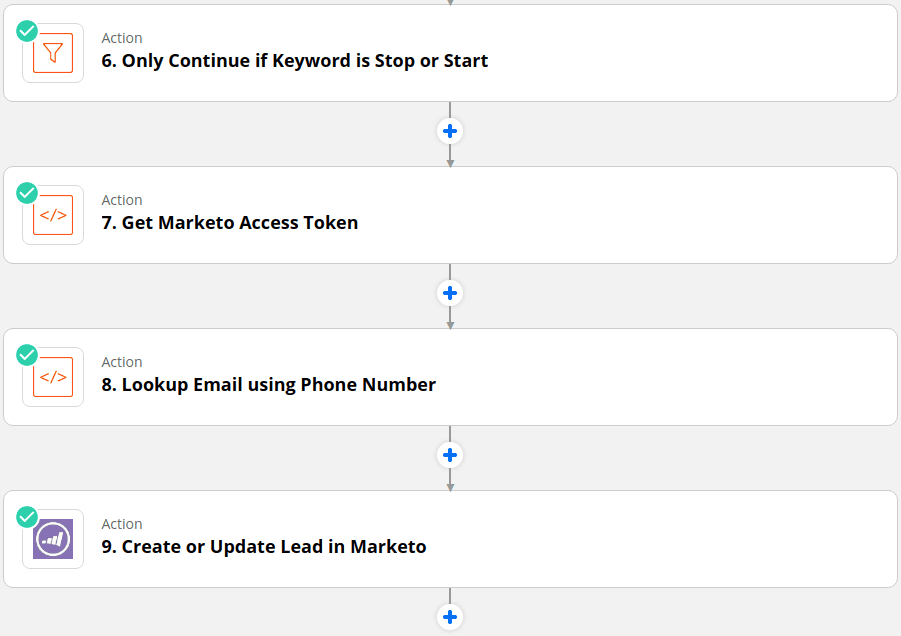
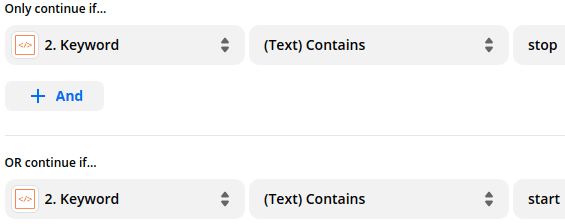
6. Only Continue if Keyword is Stop or Start
This is a simple filter that will only allow the Zap to continue if the keyword variable from Step 2 contains the word “stop” or “start”.
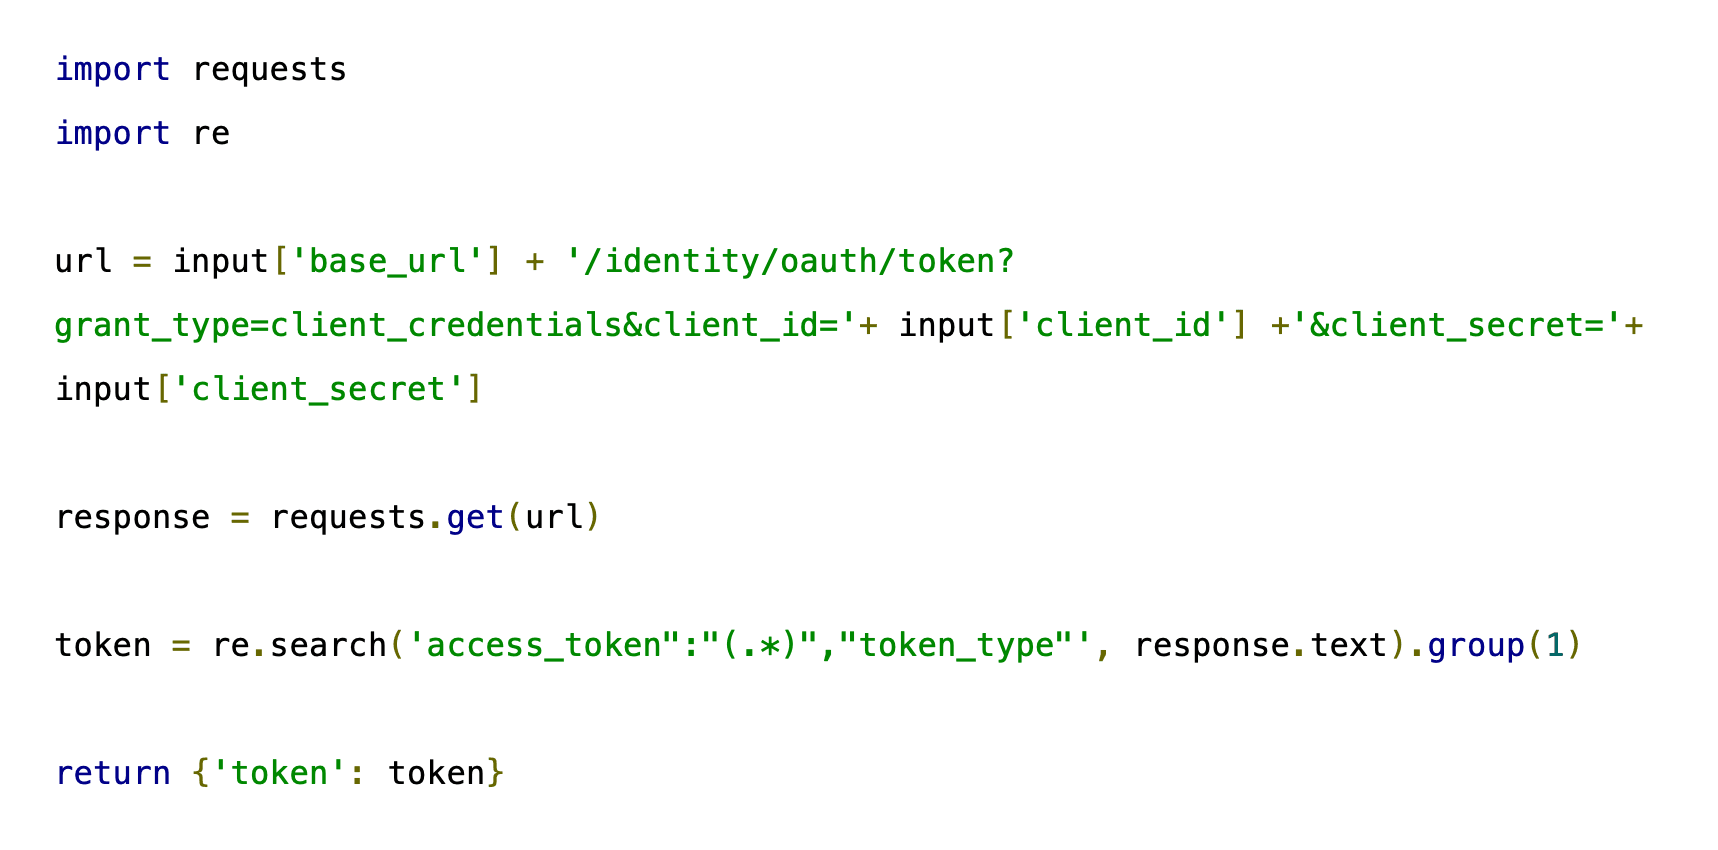
7. Get Marketo Access Token
A “Code by Zapier” action is used with the Python code below in order to get the access token necessary to do the lookup in Step 8. If you need help finding your Marketo REST API authentication credentials, take a look at the authentication section in the Marketo REST API docs.
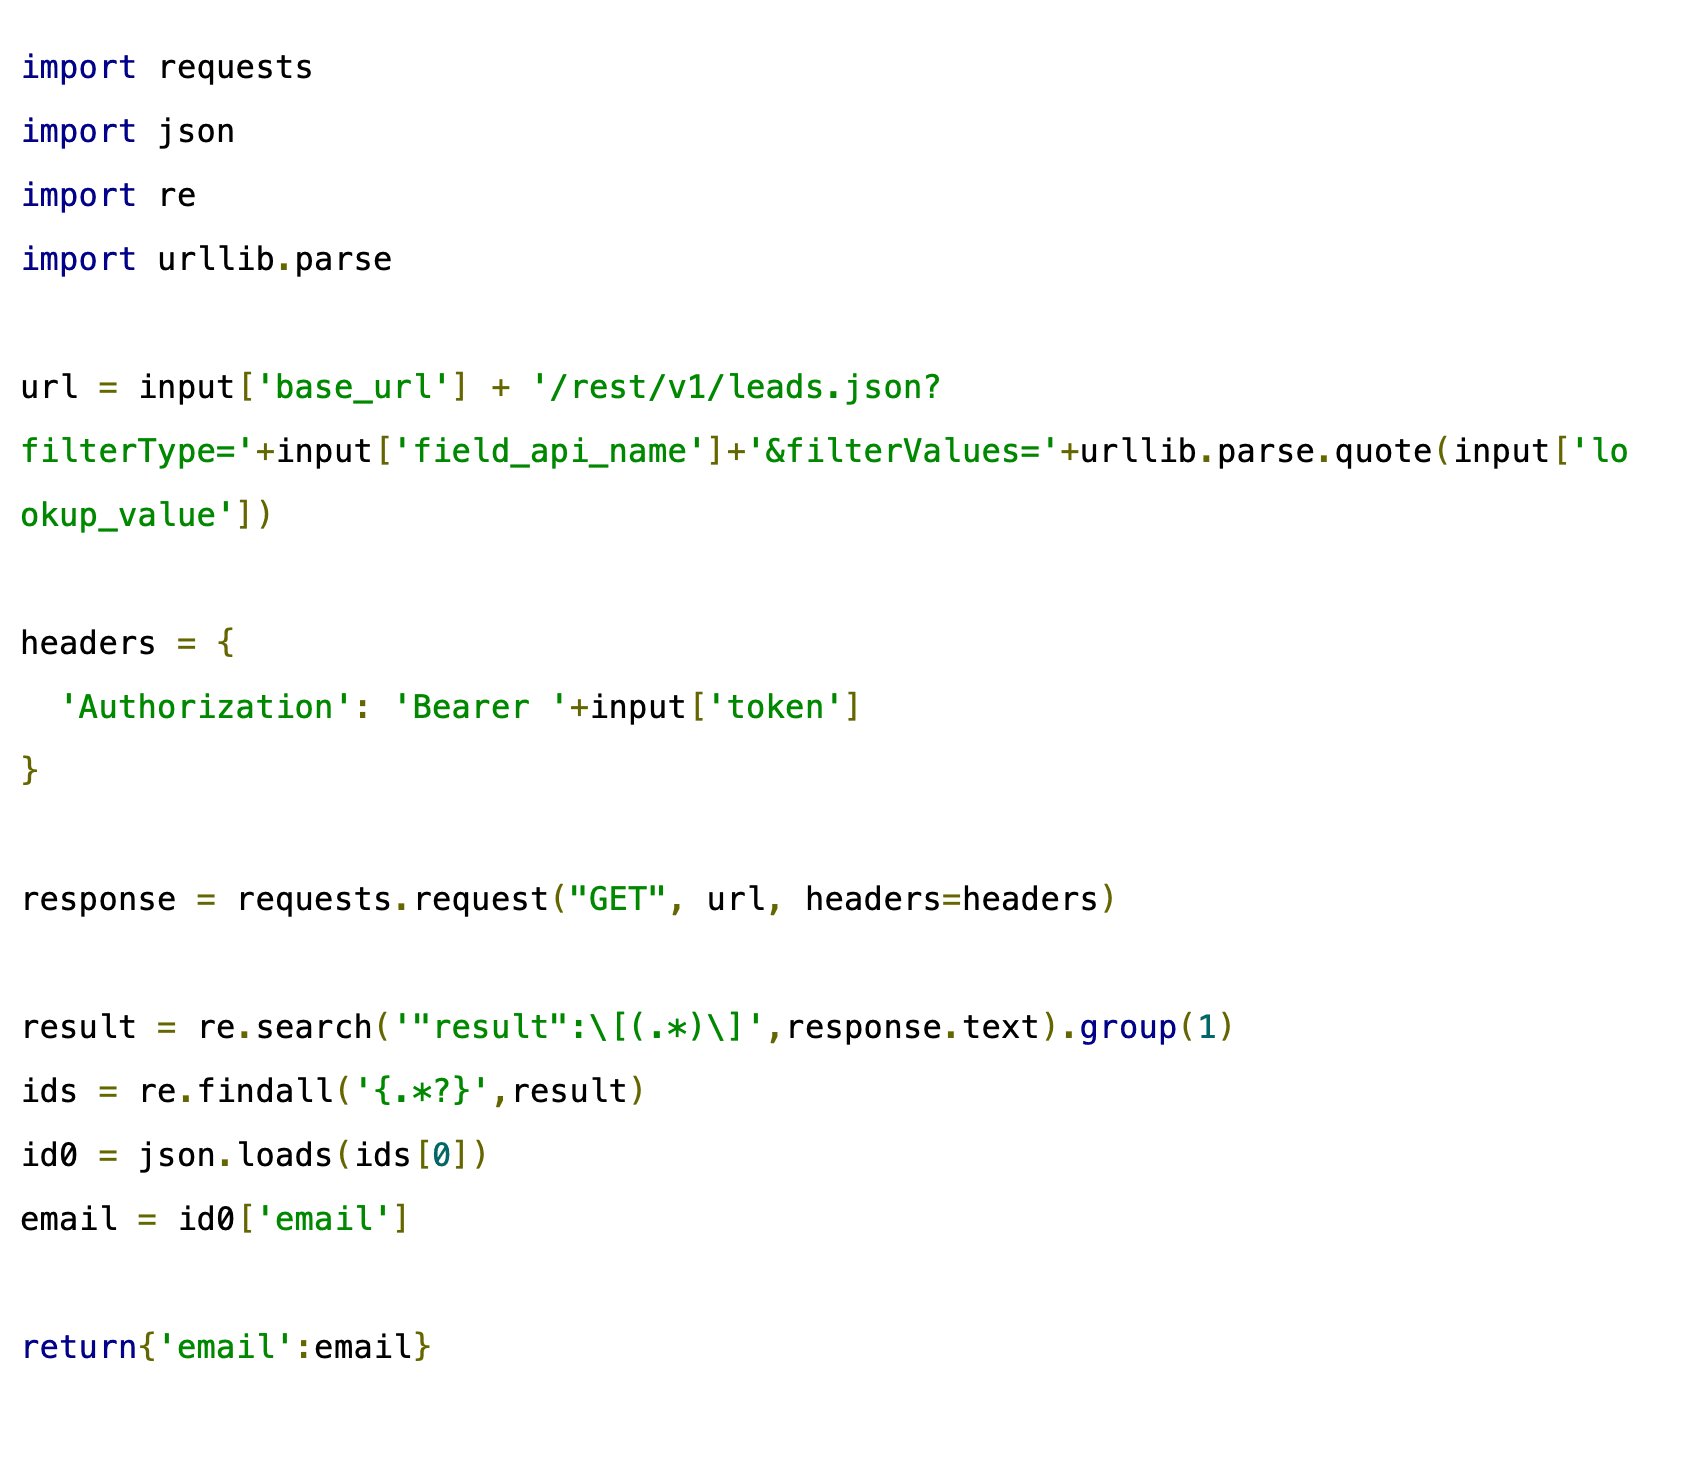
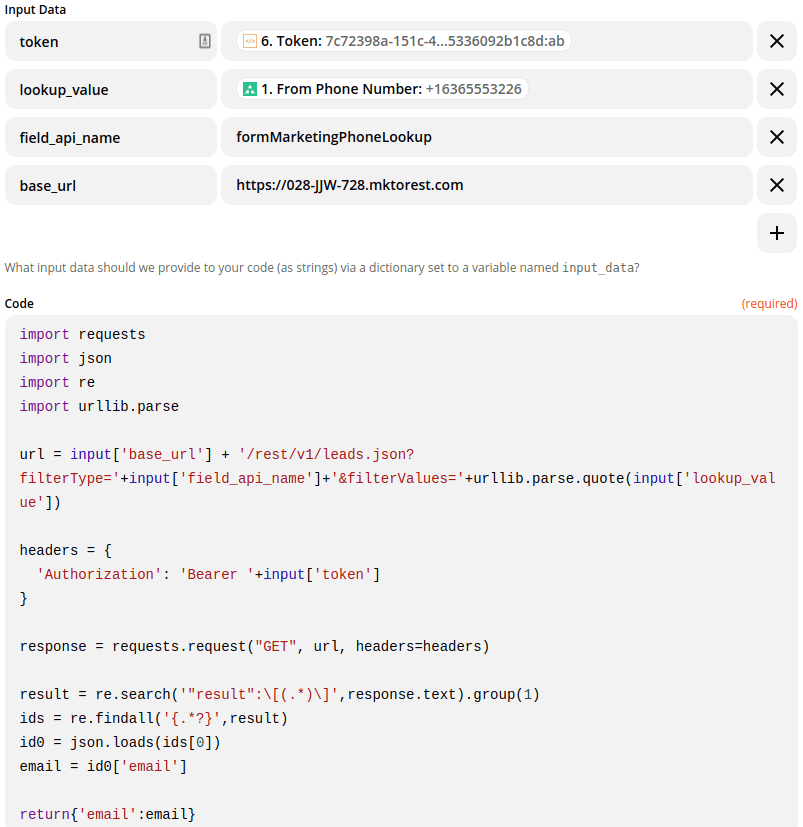
8. Lookup Email using Phone Number
The “Create or Update Lead in Marketo” action used in Step 9. can only use the person’s email address to do the lookup. Consequently, that means we need to match the phone number of the person who replied to their email address in Marketo.
The Marketo REST API offers the option to query leads using fields and their values as filters. Note that it is necessary to URL encode the lookup phone number for the request to go through successfully. Additionally, in the case that multiple leads share the same phone number the findall function is used to get the returned information for all matching leads and by default the email of the first matching lead will be returned by this code.
Transferring Phone Field Value to a String Field
One thing to note though is that fields with the type of “Phone” cannot be used in the lookup request. Therefore, a workaround needs to be implemented to transfer the value from the phone type field to a string type field that can then be used in the lookup request.
This is achieved using a Marketo smart campaign that triggers anytime the phone field (“Form – Marketing Phone” in this case) changes and then transfers the value of this phone field to a string field (“Form – Marketing Phone Lookup”) using the lead token. This string field is the one that should be referenced in the lookup request above.


Note: Notice how the default “Phone” field, which maps to the “Phone” field on the lead and contact in Salesforce, is not being used here. The reason for creating a separate phone field is to ensure that only marketing will have access to this phone number and that sales members cannot reach out to leads using this phone.
9. Create or Update Lead in Marketo
The email address obtained from Step 8. can now be used in the “Create or Update Lead in Marketo” action to identify the person and change their SMS subscription field e.g. “SMS Subscription – Webinar”, to true/false using the subscription value returned from Step 2.

Using 2 Way SMS with Marketo
Now that your 2 way SMS mechanism for Marketo is up and running, take a look at how you can use Marketo and Telnyx SMS API to send webinar reminders.
The exact same logic used in Step 2 above can be used to build auto-responders for any marketing campaign. For example:
- If SMS contains “Yes” then send X
- If SMS contains “No” then send Y
- Else send Z
The possibilities are endless!
Enjoy the tutorial? Make sure to check out the full version on the Workflow Pro Blog!
FAQ
What is a fax API? A fax API is a set of web endpoints that let software send and receive faxes through the cloud instead of a physical fax machine. Teams integrate it into CRMs or EHRs to automate document transmission and tracking.
How does a programmable fax API work? Your app makes an authenticated request with the destination number and a document like PDF or TIFF, then the service converts and delivers it to the recipient’s fax endpoint. Status webhooks return delivery events, error codes, and metadata so you can retry, escalate, or log.
Is fax still used, or should I move to digital alternatives? Fax persists in regulated sectors such as healthcare and legal because it fits established workflows and compliance controls. For image-based updates or short documents, many teams adopt messaging where the distinctions between SMS and MMS determine media support and file size.
Is a fax API secure and HIPAA compliant? Security depends on your provider and configuration, so look for encryption in transit and at rest, access controls, audit logs, and signed BAAs where required. Your application design also matters, including data retention policies and how you handle PHI in logs and backups.
Does Windows 10 have a built-in fax program? Windows includes Windows Fax and Scan, which can send and receive via a connected phone line or fax modem. It is not an API and lacks cloud scalability, so developers typically use hosted fax services for automation.
How is fax different from SMS or MMS for sending documents? Fax transmits page images and return statuses over telephony or internet fax protocols, while MMS messaging carries media like images and video over carrier messaging networks. SMS carries text only, so document delivery via messaging typically uses MMS or links to hosted files.
How do I send a fax or document to many recipients programmatically? Most fax APIs support bulk jobs and rate limits, so you queue multiple destinations, monitor webhooks, and throttle as needed to avoid congestion. If you shift to messaging for broad outreach, choose between group or broadcast messaging based on whether recipients should see each other’s replies.
Share on Social