
SIP Trunking
How to set up a SIP trunk with Telnyx
Set up a SIP trunk on Telnyx in about ten minutes. Configure a softphone or PBX against sip.telnyx.com and place your first call.

Setting up a SIP trunk on Telnyx takes about ten minutes. You create an account, add a SIP connection, point a softphone or PBX at sip.telnyx.com, attach an Outbound Voice Profile, buy a number, and place a test call.
This guide walks through each step, covers ports, codecs, encryption, and the errors that trip people up on the first call.
Quick setup: Create a Telnyx account, build a SIP connection (Credentials, IP, or FQDN), configure your device against sip.telnyx.com on port 5060 (or 5061 for TLS), assign an Outbound Voice Profile, purchase a number, set it as your Caller ID, and dial out. Most first trunks are live in under ten minutes.
You can also follow the get started guide in the Telnyx docs, which covers the same flow end to end.
Before you start
A SIP trunk carries voice over your internet connection instead of a physical phone line, so a few things need to be in place before you configure anything.
- A Telnyx account. Self-service signup, no sales call required.
- An endpoint. A softphone (Zoiper, Linphone, Bria), an IP phone, or a PBX such as Asterisk, FreePBX, 3CX, or Grandstream.
- Bandwidth headroom. Each concurrent call consumes roughly 87 kbps on the wire with the G.711 codec, or about 31 kbps with G.729, once IP, UDP, and RTP overhead is counted. Ten simultaneous G.711 calls need roughly 900 kbps in each direction.
- A network that passes SIP cleanly. Enable Quality of Service (QoS) to prioritize voice, and disable SIP ALG on your router. SIP ALG rewrites SIP packets in transit and is the most common cause of one-way audio and failed registration.
- Stable latency and jitter. Voice punishes jitter more than raw bandwidth. Prioritizing voice traffic with QoS keeps packet timing steady, and Telnyx applies jitter buffering on its side to smooth what the network cannot.
If you are still deciding whether SIP trunking fits your setup, what a does and cover the fundamentals.
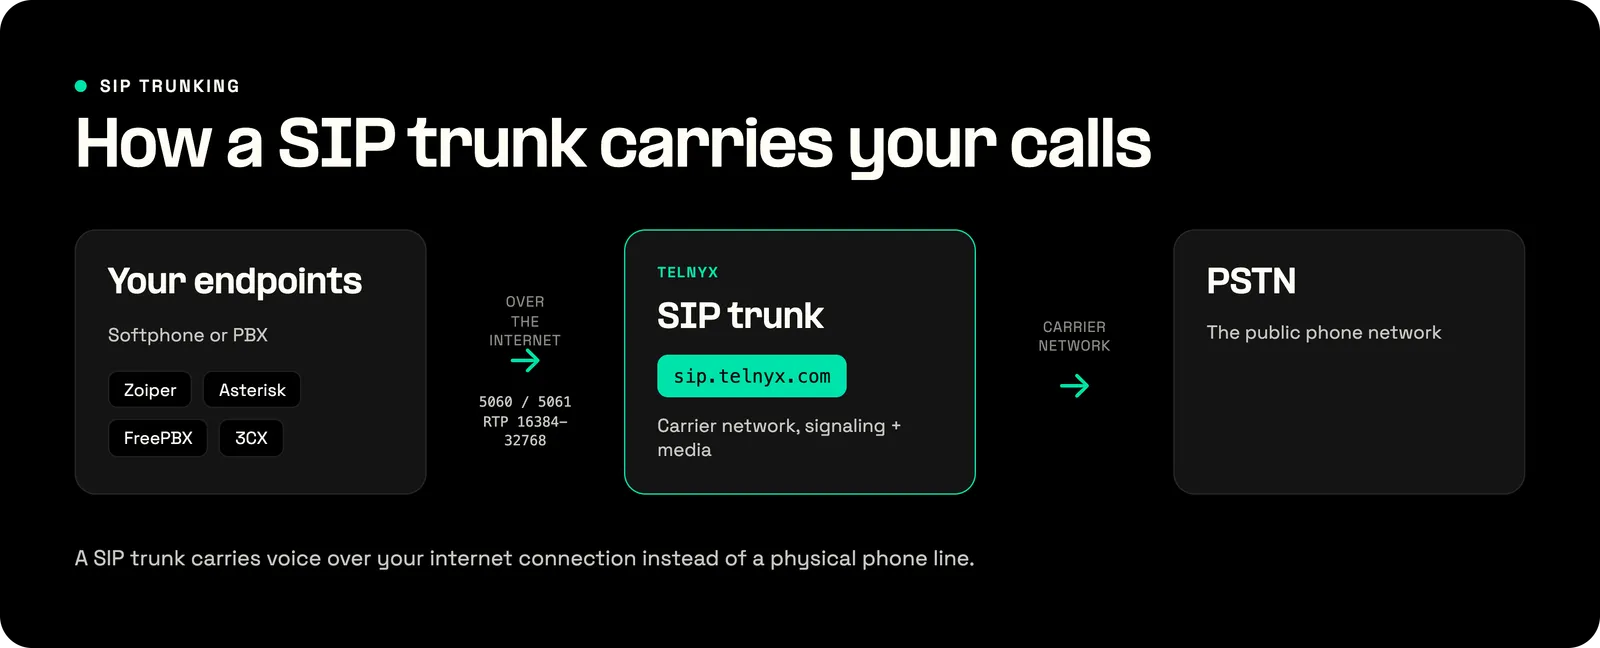
SIP trunk setup steps
The six steps to set up a SIP trunk on Telnyx
| Step | Action | Where |
|---|---|---|
| 1 | Create a Telnyx account | Sign up |
| 2 | Create a SIP connection | SIP connection types |
| 3 | Configure your softphone or PBX | Configuration guides |
| 4 | Set up an Outbound Voice Profile | Voice documentation |
| 5 | Purchase a phone number | Number pricing |
| 6 | Assign the number to Caller ID | Outbound options |
Step 1: Create your Mission Control Portal account
Sign up for the Mission Control Portal, the self-service console where every connection, number, and profile lives. Setup takes minutes, and support is available 24/7/365 if you get stuck.
SIP itself is defined by IETF RFC 3261, the standard for initiating, maintaining, and terminating sessions over IP. You do not need to read it to set up a trunk, but it is the reference behind every setting below.
Step 2: Create a SIP connection
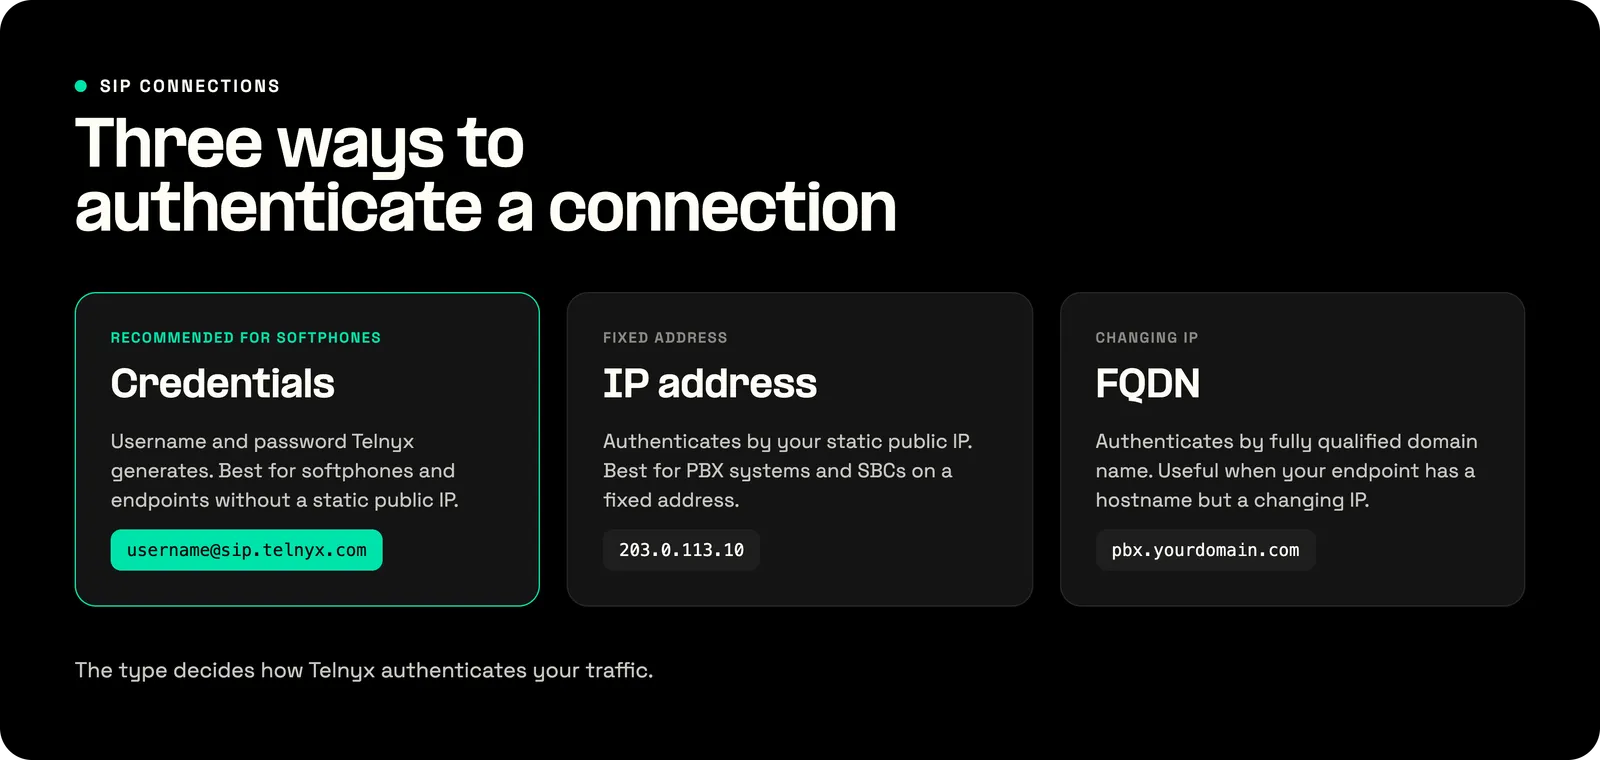
In the left navigation, select SIP Connections, click Add SIP Connection, name it, and click Create. Telnyx then asks which connection type you want. The type decides how Telnyx authenticates your traffic.
- Credentials. Telnyx generates a username and password. Best for softphones and any endpoint without a static public IP.
- IP address. Authenticates by your static public IP. Best for PBX systems and SBCs on a fixed address. If that IP changes, calls fail, so only use it where the address is stable.
- FQDN. Authenticates by fully qualified domain name. Useful when your endpoint has a hostname but a changing IP.
For a softphone, choose Credentials. Telnyx generates the username and password automatically. Use a strong password with special characters for any production connection, then click Save & Finish Editing.
Not sure how many connections or channels you need? Business SIP trunking breaks down capacity planning.
Step 3: Configure your softphone
This example uses Zoiper, but any SIP softphone works. In Zoiper, open Accounts, click Add, and enter your username and SIP domain in this format:
[email protected]Enter the password from your Credentials connection and click Login. Zoiper shows the account as registered. Confirm the username, password, and domain before your first call.
Use these settings for any softphone or IP phone:
SIP settings for a softphone or IP phone
| Setting | Unencrypted | Encrypted (TLS/SRTP) |
|---|---|---|
| SIP domain / server | sip.telnyx.com | sip.telnyx.com |
| SIP port | 5060 | 5061 |
| Transport | UDP or TCP | TLS |
| Outbound proxy | sip.telnyx.com | sip.telnyx.com |
For SIP server addresses outside the US, check the Telnyx signaling addresses table. Telnyx anchors media regionally, for example sip-eu.telnyx.com for Europe and sip.telnyx.com.au for Australia.
Connect a PBX to your Telnyx SIP trunk
To connect a PBX, create a SIP trunk on the PBX pointed at sip.telnyx.com, then authenticate it by static IP or by the credentials from your SIP connection. Use IP authentication when the PBX sits on a fixed public address, and credentials when it does not. The softphone walkthrough above and the PBX path share the same Telnyx connection, so nothing changes on the Telnyx side.
Telnyx maintains tested configuration guides for the common platforms. Match the codec order and NAT traversal settings in your platform's guide, because a codec mismatch or an untraversed NAT is the most frequent cause of a PBX trunk that registers but drops audio.
Telnyx SIP trunk configuration guides by PBX platform
| PBX platform | Auth | Configuration guide |
|---|---|---|
| Asterisk | IP or credentials | Asterisk credentials trunk |
| FreePBX / Elastix | IP or credentials | FreePBX trunk settings |
| Cisco CUBE / CUCM | IP | Cisco CUBE/CUCM IP trunk |
| 3CX, Grandstream, Yeastar, FreeSWITCH, Avaya | IP or credentials | All configuration guides |
On FreePBX specifically, the trunk works under either the ChanSIP or PJSIP driver, and the credentials trunk is the faster path if your PBX does not have a static IP.
Set up a SIP trunk with the API
Every step in this guide can be scripted through the Telnyx API instead of the portal, which is how most teams provision trunks at scale. The building blocks map directly to the portal objects: create a connection with the credential_connections, ip_connections, or fqdn_connections resource, attach an outbound_voice_profiles resource for outbound routing and spend limits, then assign a number. Routing, failover, and AnchorSite are all set through the same API, so you can stand up an identical trunk in code and version-control the configuration.
Ports and codecs reference
Open these ports on your firewall for signaling and media.
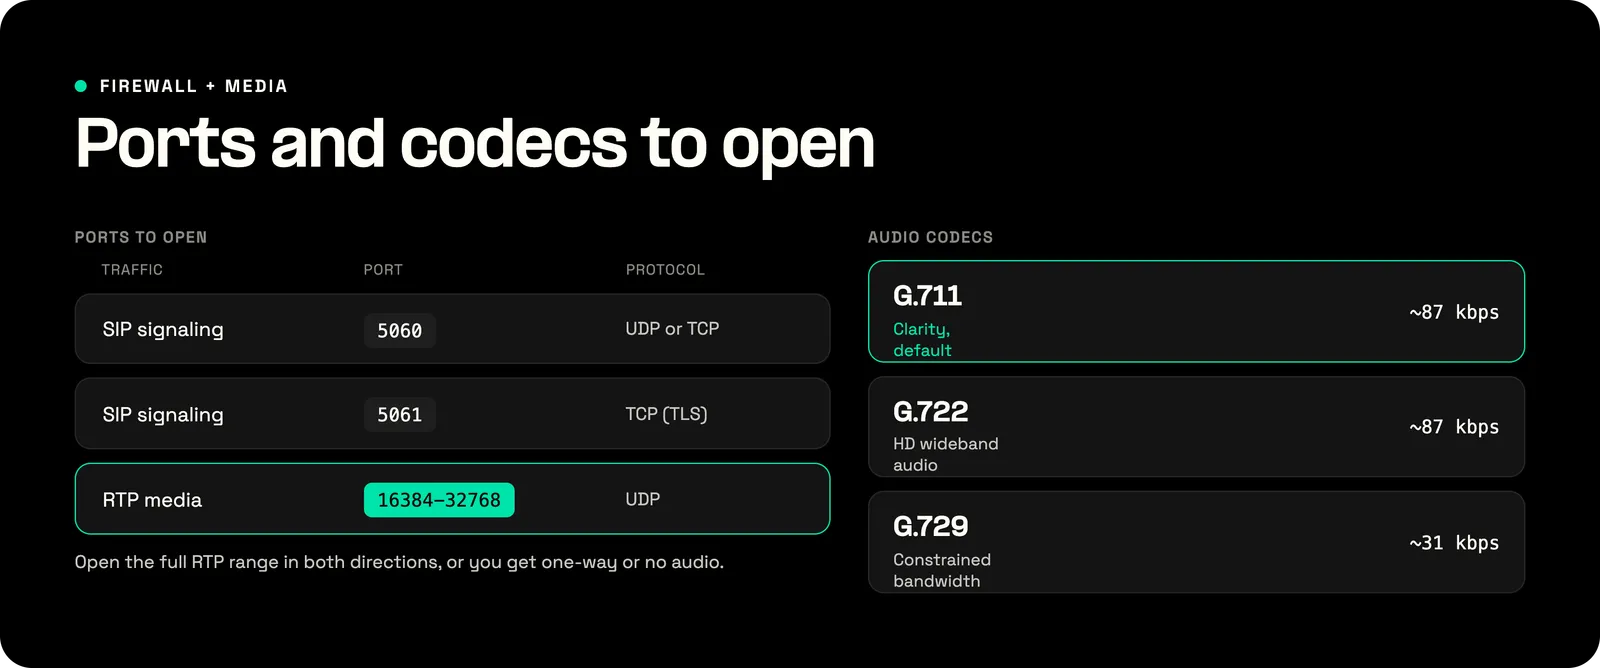
SIP signaling and media ports
Ports to open for SIP signaling and RTP media
| Traffic | Port | Protocol |
|---|---|---|
| SIP signaling (unencrypted) | 5060 | UDP or TCP |
| SIP signaling (TLS) | 5061 | TCP |
| RTP media (open both directions) | 16384-32768 | UDP |
The RTP media range is 16384 to 32768, not the generic 10000 to 20000 range some guides quote. Open the full range in both directions or you will get one-way or no audio.
Audio codecs
Telnyx supports these codecs. Set them in order of preference on your device.
Supported audio codecs and approximate per-call bandwidth
| Codec | Approx. bandwidth per call | Best for |
|---|---|---|
| G.711 (µ-law / A-law) | ~87 kbps | Clarity, default choice |
| G.722 | ~87 kbps | HD wideband audio |
| G.729 | ~31 kbps | Constrained bandwidth |
Per-call figures include IP, UDP, and RTP overhead over Ethernet (Cisco).
Encryption
For production, encrypt both signaling and media. Enable Encrypted SIP Traffic on the connection, use TLS on port 5061 for signaling, and SRTP for media. SRTP is specified in IETF RFC 3711. One caution: if you enable encryption on the connection but your device still sends plain UDP or RTP, Telnyx rejects the call with error 488. Match both ends.
Step 4: Create an Outbound Voice Profile
Before you can dial out, attach an Outbound Voice Profile (OVP) to your connection. A connection with no OVP rejects outbound calls with response code D38 or D7.
Open the Outbound Voice Profiles tab, click Add New Profile, name it, and click Create. Search for your connection by name, select it, and click Add Connection/Apps to profile.
Set spending controls to block toll fraud
Under Allowed Destinations, limit traffic to the regions you actually call. Then open Advanced Settings and set a Max Destination Rate and a Daily Spend Limit per connection. These two controls are your main defense against toll fraud, where an attacker hijacks a trunk to place high-cost international calls. The Communications Fraud Control Association puts industry fraud losses in the billions each year, and a daily spend cap is what stops a compromised trunk from running an unbounded bill overnight instead of stopping at a number you chose. Enable call recording here too if you need it, then click Save.
Step 5: Purchase a number and set Caller ID
Open the Numbers tab and click Search & Buy Numbers. Filter by area code, region, and features, click Search Numbers, add one to your cart, and place the order. The number appears under My Numbers.
To use it as your outbound Caller ID, copy the number, return to your connection under SIP Connections, open Outbound Options, paste it into the Caller ID Override field, and click Save all Changes. Outbound calls from your softphone now show that number.
If your trunk will place calls that could ever reach 911, register an emergency address for the number now. Telnyx supports dynamic E911, and setting the address at provisioning time keeps emergency routing correct from the first call.
Step 6: Place a test call
Dial a number from your registered softphone or PBX. If the call connects with two-way audio, your trunk is live. Following this guide, most people place a first outbound call in under ten minutes.
Troubleshooting the first call
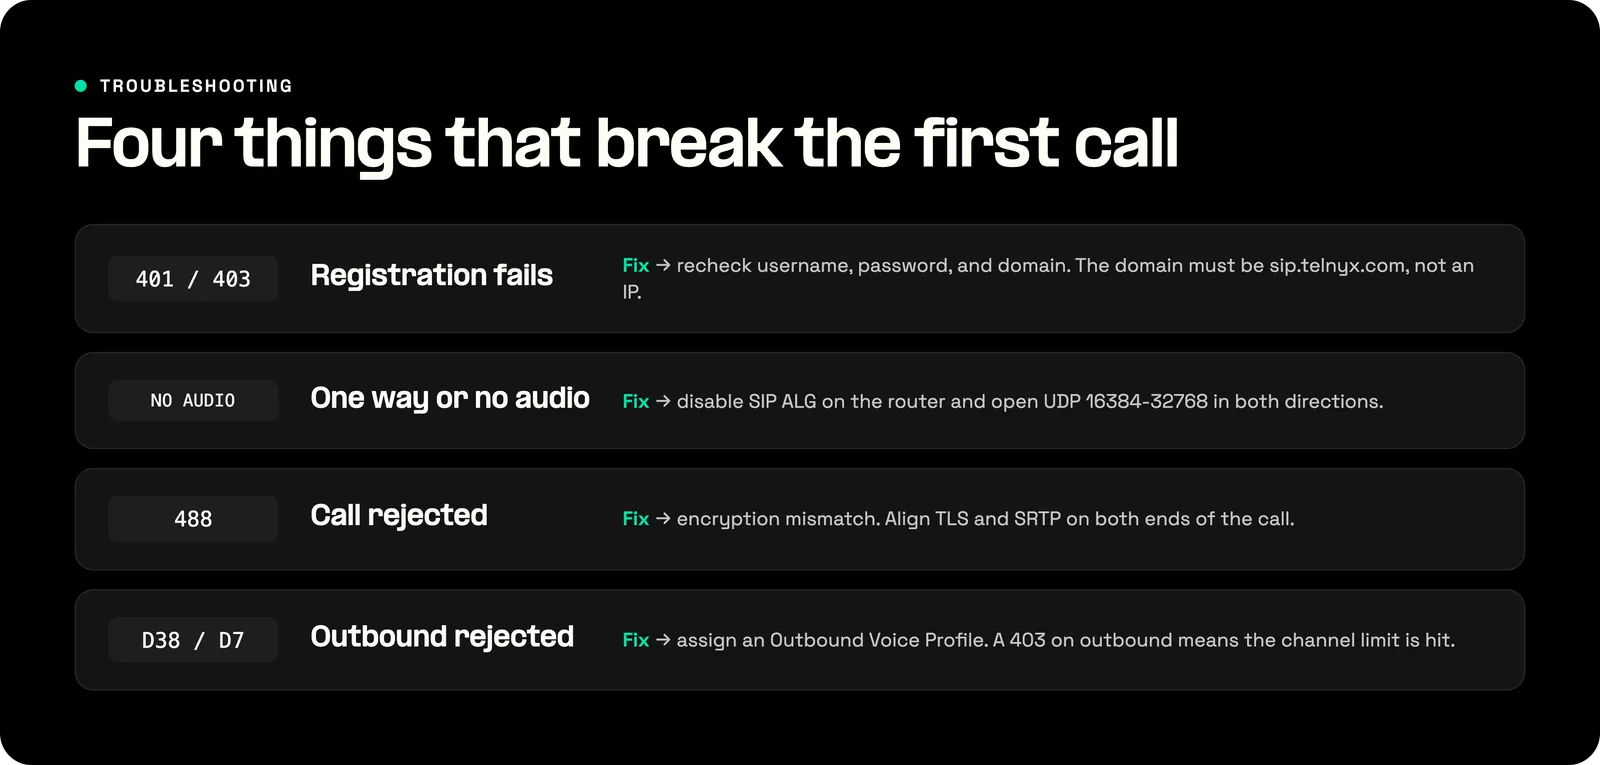
Most first-call problems fall into four buckets, and each has a clear signature.
- Registration fails (401 / 403). Recheck the username, password, and domain. The domain must be
sip.telnyx.com, not an IP. - One-way or no audio. Almost always SIP ALG on the router or a blocked RTP range. Disable SIP ALG and open UDP 16384–32768 in both directions.
- Call rejected with 488. Encryption mismatch. The connection expects TLS/SRTP but the device sent plain UDP or RTP, or the reverse. Align both ends.
- Outbound calls rejected (D38 / D7, or 403). D38/D7 means no Outbound Voice Profile is assigned. A 403 on outbound usually means you hit the connection's channel limit.
For packet-level diagnosis, our guide to reading a trace with Wireshark and tcpdump walks through a real capture.
Next steps
Once your basic trunk works, these cover what comes next.
- Encryption and quality: HD SIP for clearer, encrypted calls.
- Cost planning: SIP trunking cost breaks down real pricing.
- Provider evaluation: SIP provider comparison if you are still weighing options.
- Industry use cases: how SIP trunking powers healthcare and logistics communications.
FAQ
Does Telnyx offer SIP trunking? Yes, Telnyx offers elastic SIP trunking on its own global carrier network, with SIP Connections for inbound traffic and Outbound Voice Profiles for outbound routing. See SIP trunk pricing.
What is my Telnyx SIP server address?
sip.telnyx.com for both signaling and media in the US, on port 5060 for unencrypted traffic or 5061 for TLS. It also serves as your outbound proxy. Regions outside the US use their own signaling addresses, listed at sip.telnyx.com.
Can I set up a SIP trunk with my existing PBX?
Yes, Telnyx has tested configuration guides for Asterisk, FreePBX, FreeSWITCH, 3CX, Grandstream, Yeastar, and more. Point the PBX trunk at sip.telnyx.com and authenticate by credentials or static IP.
Does Telnyx support TLS and SRTP encryption? Yes, Telnyx supports both. Enable Encrypted SIP Traffic on your connection, use TLS on port 5061 for signaling, and SRTP for media. If one end sends unencrypted traffic while the connection expects encryption, the call is rejected with error 488.
How many concurrent calls can a SIP trunk handle, and how much bandwidth do they need? There is no fixed ceiling. You set a channel limit per connection. Budget roughly 87 kbps per concurrent G.711 call, or 31 kbps with G.729, in each direction.
Can I use a number I already own? Yes, port your existing numbers to Telnyx and assign them to the connection instead of buying new ones. Number porting moves them onto your account, and the Caller ID and routing steps are identical once they land.
Can I set up a SIP trunk with the Telnyx API instead of the portal? Yes, the whole flow is available through the Telnyx API: create a credential, IP, or FQDN connection, attach an Outbound Voice Profile, and assign a number, all in code. Most teams provisioning many trunks script it rather than clicking through the portal.
How long does it take to set up a SIP trunk? For a basic outbound softphone trunk, about ten minutes. PBX and multi-region setups take longer, mostly in codec and NAT tuning.
Check SIP trunk pricing, explore the full product catalog, or talk to our team about a larger deployment.
Share on Social
Fiona McDonnell is Product Marketing Lead at Telnyx. Rather than writing about AI infrastructure and messaging compliance from the outside, she's run go-to-market directly for Telnyx's inference products and its trust-focused messaging and voice capabilities. That means she's see


